Leaderboard
Popular Content
Showing content with the highest reputation on 07/15/2018 in all areas
-
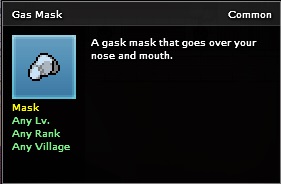
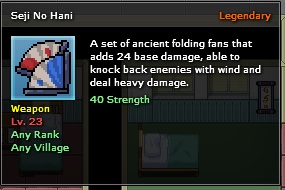
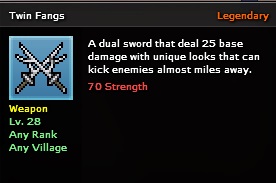
Hello guys. I know most prices are already established in the game amongst the higher-level players, however, I feel like the low-level's deserve a fair chance too. As such, I'm posting a list with the market prices of each item. If they do not sell on the market, I will just insert their value when sold in any village store. (If anything is wrong with the list, notify me by PMing me on discord or just correct me on this post itself.) You should, naturally, feel free to add in on all the things that I have personally forgotten the prices of, such as the Tunneler's tongues. I mean, come on... They only thing I farm nowadays is wolf fur, lol. Thank you! Without further ado, here are the lists: Items with no market price: Cocoon (14-09-2020) 1 ryo each Spider Eggs (14-09-2020) 2 ryo each Scorpion Tail (14-09-2020) 2 ryo each Ant Feelers (14-09-2020) 2 ryo each Dragonfly Wings (14-09-2020) 2 ryo each Canine Fang (14-09-2020) 3 ryo each Honey Comb (14-09-2020) 3 ryo each Fox Fur (14-09-2020) 3 ryo each Tiger Fur (14-09-2020) 4 ryo each Scarab Shells (14-09-2020) 4 ryo each Rat Tails (14-09-2020) 5 ryo each Tunneler's Tongue (14-09-2020) 5 ryo each Big Scarab Shells (14-09-2020) 5 ryo each Insect Wing (14-09-2020) 5 ryo each Undead Charm (14-09-2020) 5 ryo each Bear Paw (14-09-2020) 6 ryo each Grey Bear Paw (14-09-2020) 7 ryo each Hawk Talon (14-09-2020) 7 ryo each Items with market prices: Snake Venom (14-09-2020) 15-20 ryo each DNA Sample (14-09-2020) 55-75 ryo each Wolf Fur (14-09-2020) 50-100 ryo each Racoon Tails (14-09-2020) 80-100 ryo each Hawk Feather (14-09-2020) 250-350 ryo each Blank Scroll (14-09-2020) 250-300 ryo each Tier I scroll (14-09-2020) 500 ryo each Tier II scroll (14-09-2020) 1,000 ryo each Tier III scroll (14-09-2020) 1,500-2,000 ryo each Rare drops (market prices): Cigarette (14-09-2020) 1,000-2,000 ryo each Gas Mask (14-09-2020) 1,500-2,000 ryo each Seji no Hani (14-09-2020) 2,000-2,500 ryo each Poison-Laced Kunai (14-09-2020) 2,500-3,500 ryo each Twin fangs (14-09-2020) 3,000-4,000 ryo each Religious Katana (14-09-2020) 3,000-4,000 ryo each Black fan (14-09-2020) 3,000-6,000 ryo each Snake Rope Belt (14-09-2020) 4,000-6,000 ryo each Veiled Sakkat (14-09-2020) 4,500-7,500 ryo each Red Scarf (14-09-2020) 7,000-15,000 ryo each Great Grandfather's Muramasa (Usually just sold to the shop for 7,500 ryo) (14-09-2020) 8,000-9,000 ryo each Arms Bandages (14-09-2020) 20,000-30,000 ryo each Gloves Knuckle (14-09-2020) 20,000-40,000 ryo each Shirokata (14-09-2020) 40,000+ ryo each Dark Bandit Blade (14-09-2020) 50,000+ ryo each Ragged Bandit Pants (14-09-2020) 60,000+ ryo each Oriental Fan (14-09-2020) 80,000+ ryo each Tonfa (14-09-2020) 90,000-120,000 ryo each Blood Katana (14-09-2020) Picture: TBA 120,000-150,000 ryo each Kotsuzui Tanto (14-09-2020) 200,000+ ryo each Blood Tonfa (14-09-2020) 250,000-350,000 ryo each Festival Items: Black Dragon Festival Mask Price: TBA Red Dragon Festival Mask Price: TBA Event HQ Items: Stylish Sword (14-09-2020) 6,000-10,000 ryo each (Un)Hooded Robes (Various Colors) (14-09-2020) 6,000-10,000 ryo each Hermit Forehead Protector (14-09-2020) 6,000-10,000 ryo each Sashed Kimono (Various Colors) (14-09-2020) / 15,000-20,000 ryo each Limited-Time Tradable Cash Stop Items: Purple War Armor (14-09-2020) 4,000-6,000 ryo each Gold Furred Armor (14-09-2020) 5,000-10,000 ryo each White Hermit Cape (14-09-2020) 8,000-12,000 ryo each Ceramic War Armor (14-09-2020) 50,000-60,000 ryo each Date and time notation is written in European Format: "DD-MM-YYYY"1 point
-
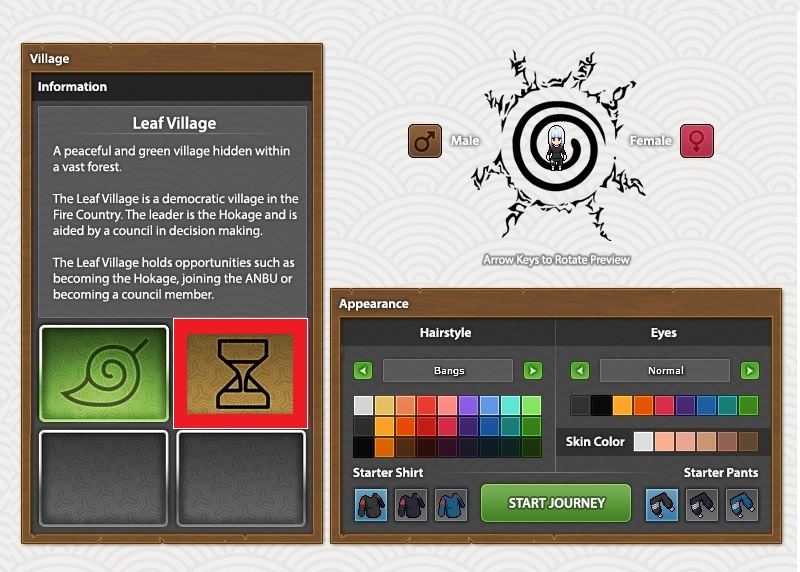
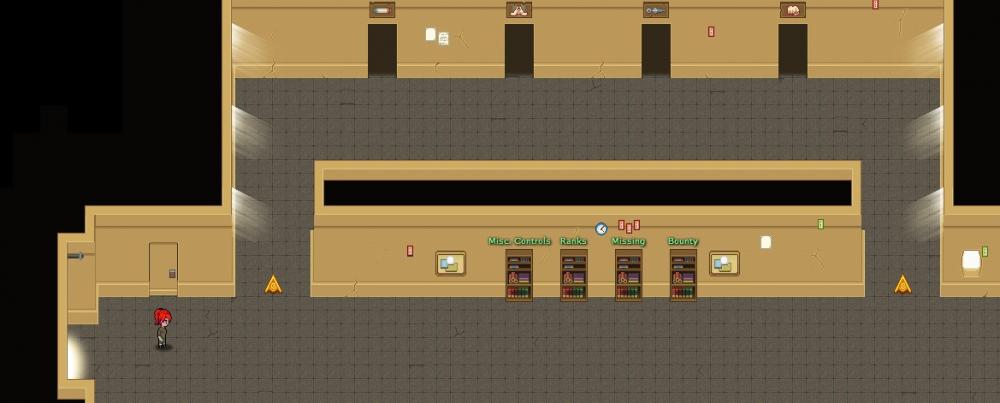
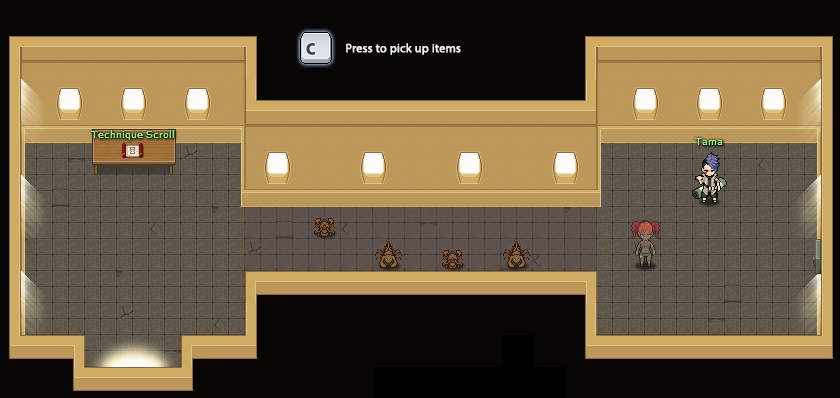
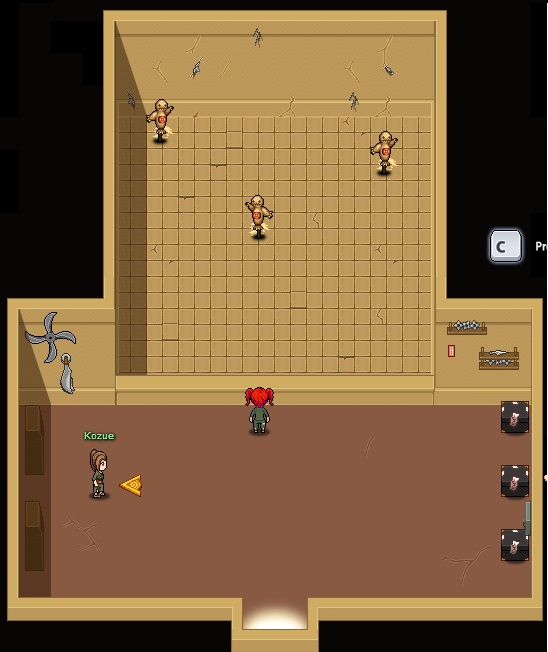
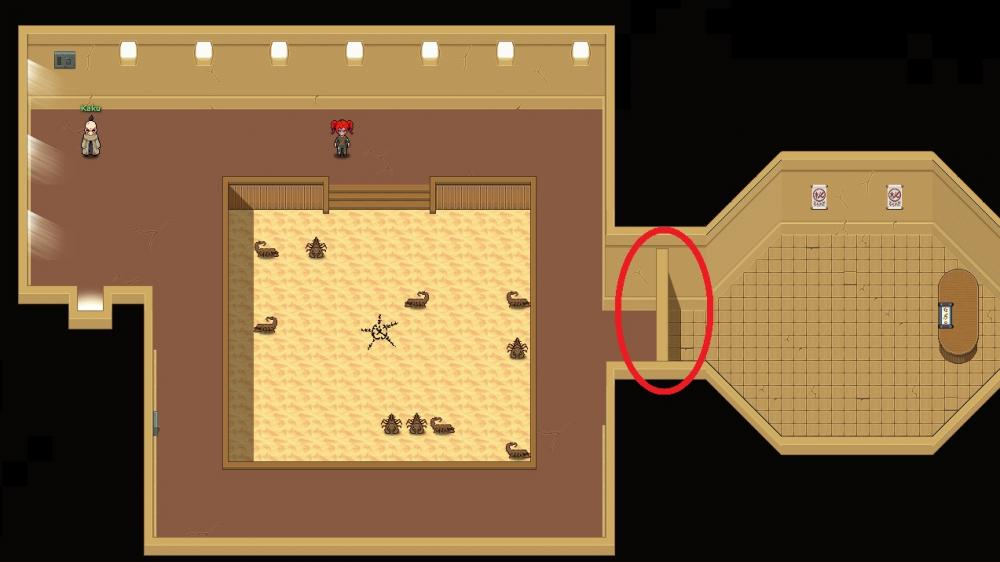
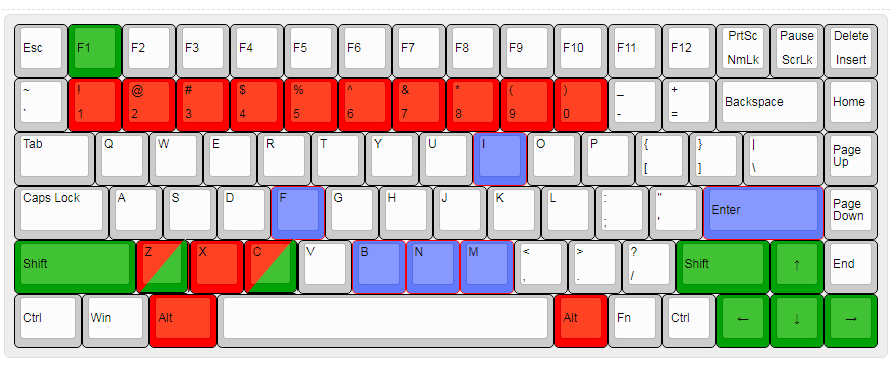
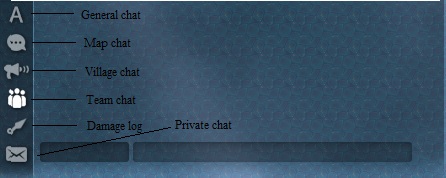
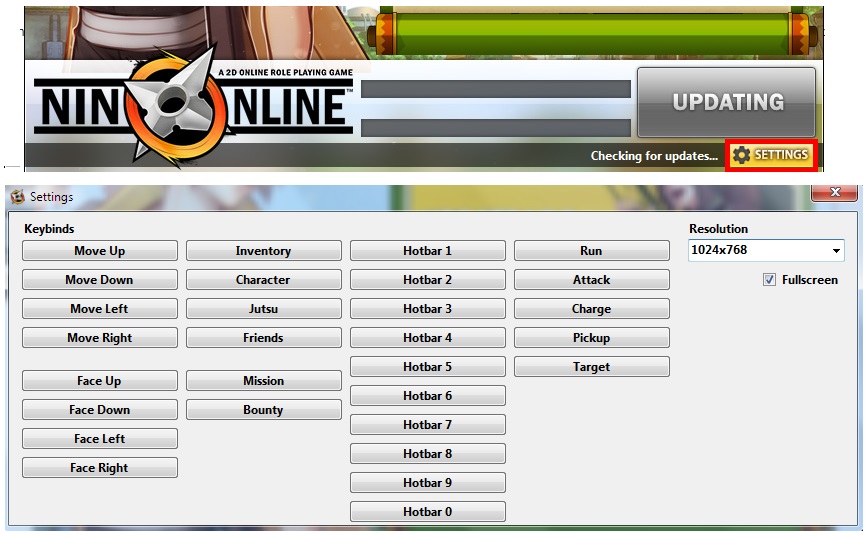
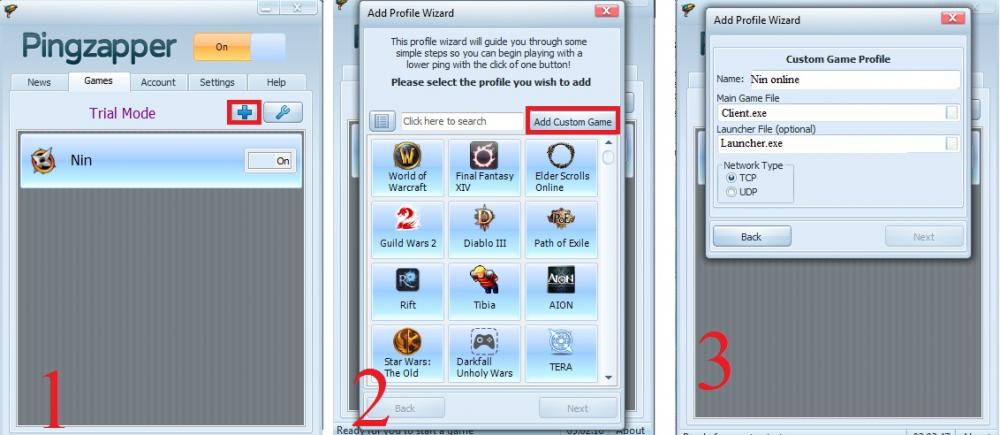
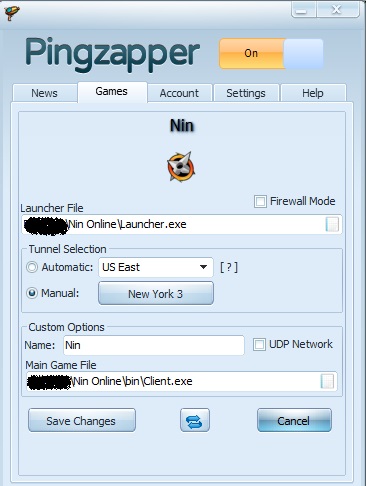
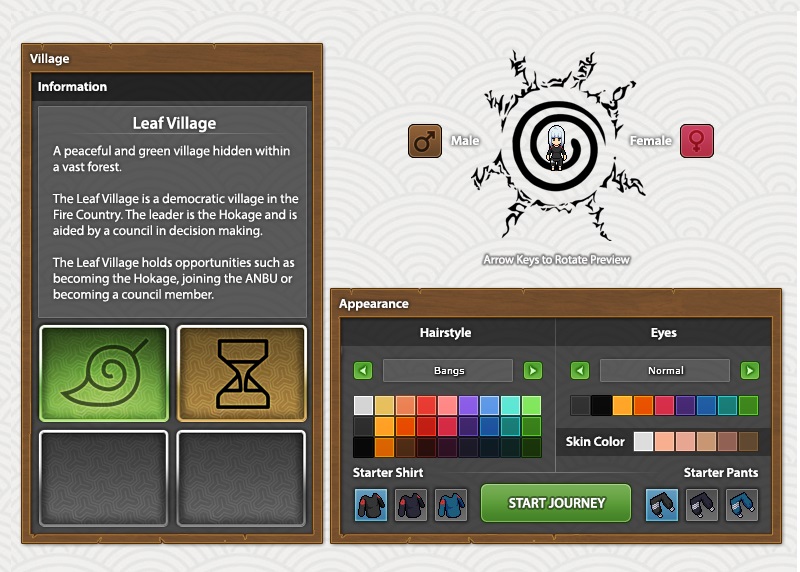
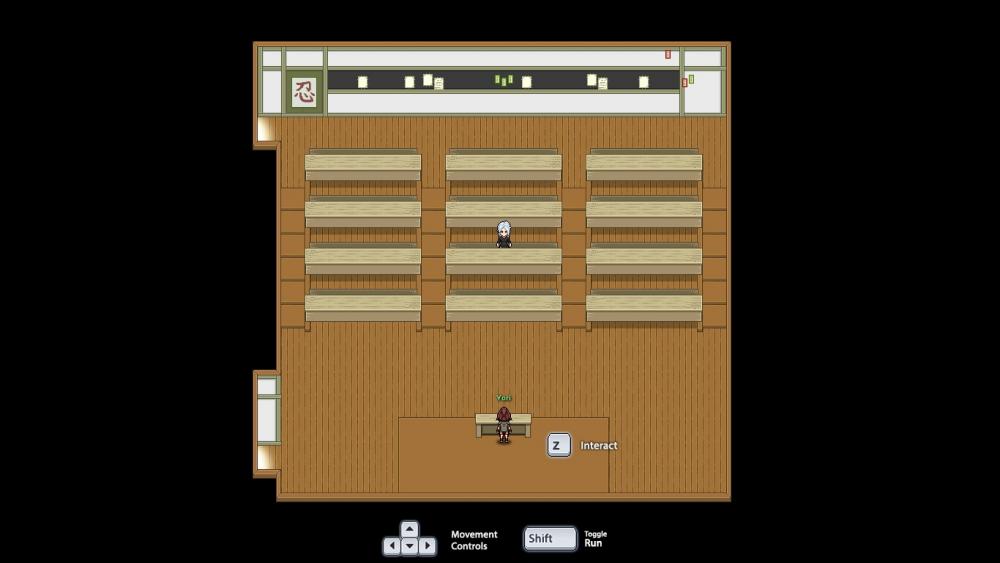
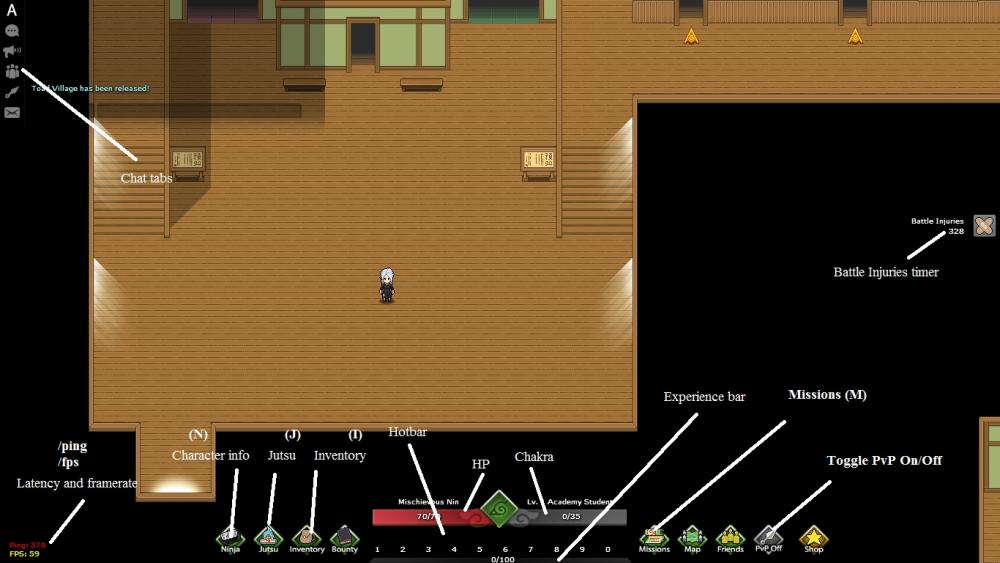
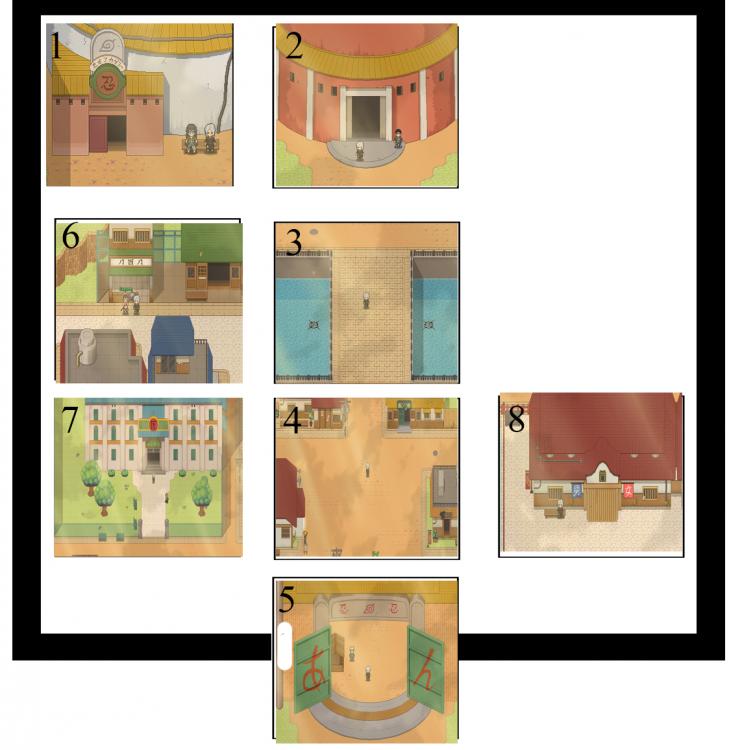
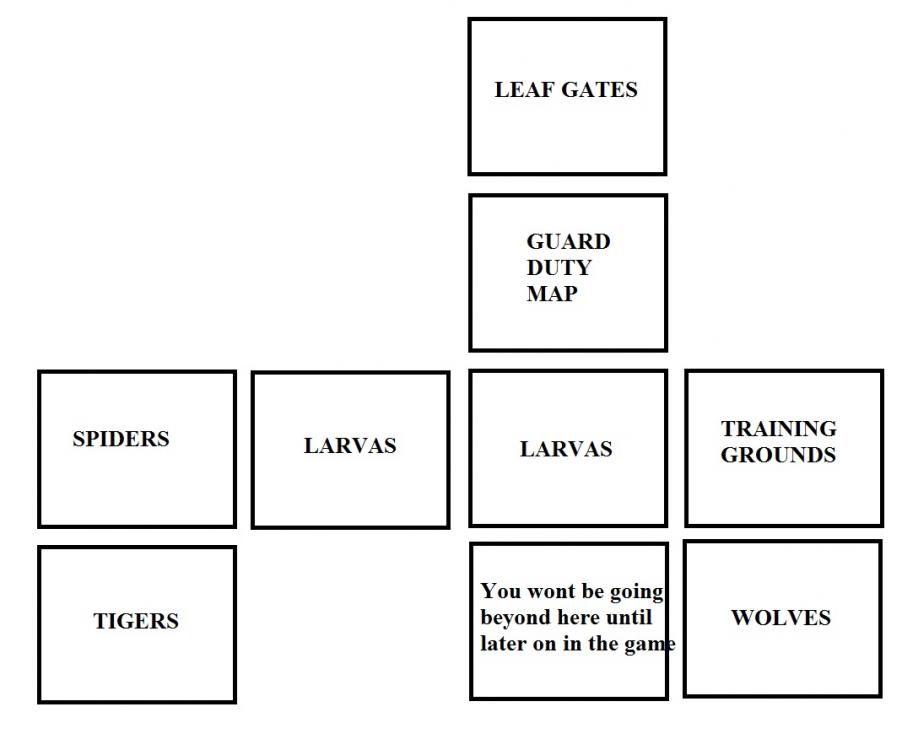
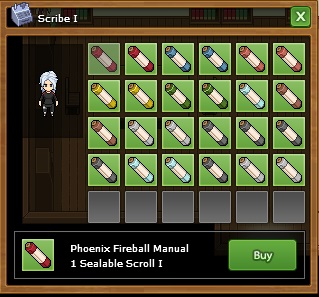
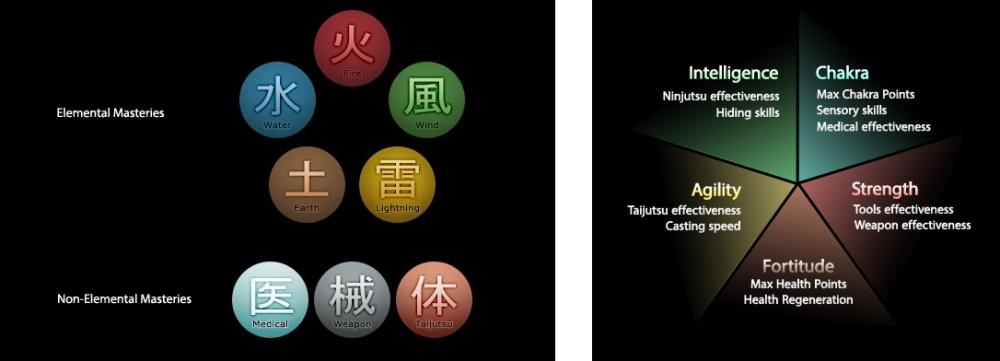
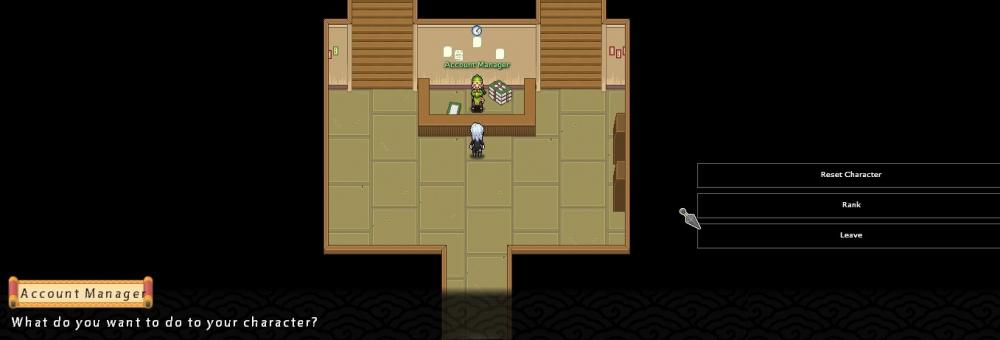
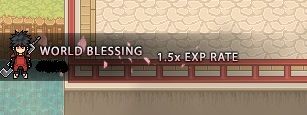
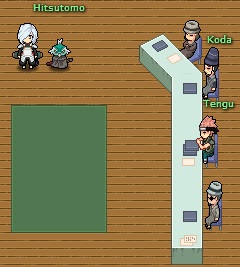
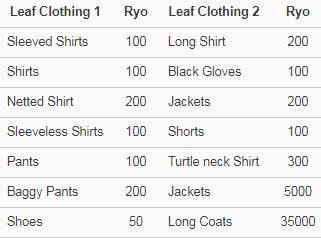
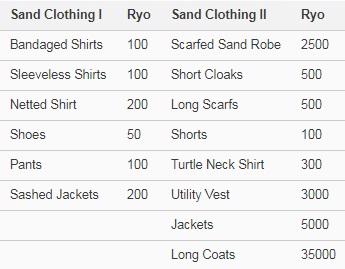
WORK IN PROGRESS - any suggestion/constructive criticism is welcome! Hello, my name is Origami Heart. As someone who looks up guides before starting a game, I had to use outdated ones for Nin, like Satsurie's. With more and more new players starting to play every day, I decided to make a more up-to-date one. I will use some Satsurei's guide as a base to work on. Also, make sure to join the game's discord server, to either ask questions, make friends or just chat with other players. Now, without further ado, I will get right into it. PART I. GENERAL INFORMATION Controls are the foundation of the entire game and make just about everything come together, they are keybinded macros which allow you to do various things with your character and other elements of the GUI. Keybindings can be changed to the user needs in the Client, by clicking settings, along with the resolution of the client/game. Navigation controls: You move your character by pressing the Arrow keys. You can move diagonally by pressing 2 arrows at the same time. You can toggle Running on and off by pressing Shift. You pick items by pressing C and speak to NPCs by pressing Z. You can also hide the UI by pressing the F1 key. Combat controls: You can set your jutsus on the Hotbar (shown in the UI legend at the beginning of the guide). It uses the keys from 1-0 and you can swap between hotbars by pressing the combination of Control + the keys from 1-9. Alt allows you to self-cast, it is extremely useful for medics. You target enemies by either clicking on them with your mouse or pressing X. Z is the default attacking key. You charge chakra by holding C. Shortcuts: You can open every menu in the game by just pressing the corresponding key. I - inventory M - Missions N - Ninja (character info) B - Bounty book F - Friendslist You can type in chat by either clicking on the chat bar or pressing Enter. ------------------ Using chat: You can toggle between chats by pressing on them. *General chat shows every message from every chat (except for Damage log). *Map chat shows the messages of everyone in the map you are currently at. *You can speak in Village chat by typing /V in the small bar on the left, it is seen only seen by people from your village and is used to communicate with them when they are far from you, or when you want the whole village to hear it. *Damage log shows the damage you've dealt to monsters or players, and the damage they've dealt to you. *You can send Private messages by typing the receiver's name in the small box. You can respond to messages quickly by typing /r there. I will show you more chat commands in the RP section of the guide. ------------------ You can change the hotkeys by going to Settings after opening the client. You change a key by pressing on it with the LMB and then pressing the key you want. You can also change the resolution and choose between fullscreen and windowed mode. ------------------ A way to open more than one client at the same time is by copying the .bin file from the main game directory and pasting it somewhere else. Then you rename Client.exe (e.g. client2). Before doing so, you shoulda familiarize yourself with the TOS and the Rules. I do not condone any rule breaking, use this at your own risk. ------------------ You can reduce your ping in-game by using a TCP Optimizer or one of the 2 approved 3rd party tunneling softwares: NoPing or PingZapper. PingZapper reduces my latency from 500-600 to a stable 200. It has a 7-day trial that you get by making a PingZapper account and then connecting it to a Steam account. To set it up, your settings should follow these steps: In the end, your settings should look like this: ------------------- Firstly, after downloading and installing the game, you will create your character. In the character creation, you get to choose the village you will spawn in and work for, aswell as the way your character will look (it can be changed afterwards, mostly with in-game clothing and Cash shop items - note that the game is absolutely free-to-play and the Cash shop is almost purely for cosmetics, I will talk about it more a bit later.). The isn't a whole lot of difference between the two villages. There are different mobs (usually with same exp and HP, but different drops and numbers), different clothes, etc., but there is nothing game changing and you will not regret picking either village. As I've only played on Leaf side, the guide will be from the POV of a Leaf ninja (may add Sand in the future) After creating your character, you will get a few (skippable) cutscenes. After finishing them, you will spawn in a classroom. Talking to Yori will give start to the tutorial. After the dialogue is over, exit the classroom and you will appear in a long hallway with 4 doors. Each door is a different part of the tutorial. -The first one will teach you the basics of each mastery and the stats (I will get to them later). -The second door will show you how to charge your chakra and use a jutsu. You will also learn your first jutsu - body flicker. -In the 3rd door, you will be able to practice using tools, like shurikens and kunais. They disappear after the tutorial, so just use them to practice for a bit. -The last challenge is combat. The first time you try, you will inevitably die, but don't worry, it is part of the training. It is to show you that after fainting in combat, you get the "Battle Injuries" effect. It reduces your HP, Chakra and damage with about 50% (I will correct the percentage when I'm sure about it). After completing all 4 challenges in the tutorial, you will have to take an exam in the form of test. It consists of 20 questions split in half. After failing to give the correct answer, you have to start from the beginning. After answering the first 10 questions correctly, you get a new "safe point". The questions cover most of the stuff you learned from the tutorial and is knowledge you will actually need. After passing the exam, you have to find Yori and talk to her again. She will give you the option to choose your bandana (which you can change afterwards if you want) and with that, you become a Genin. ------------------------------------------------------------------------------------------------------------------------------------------------------------------------------------------------------------------------------ PART II. LEVELING GUIDE AND PICKING YOUR MASTERIES 1. LEAF GUIDE I got @Rory's permission to use the minimaps that will soon be added to the game. You can use it to navigate in the village. After choosing your bandana, you are ready to start your Ninja training. [1] Academy - you graduate there and can change bandana [2] Hokage building - taking missions, resetting account, Hokage residence. [3] Bridge that splits the village in South and North parts. [4] Village square - all shops but one, gathered in the same place. You can find the Weapons (swords) shop to the left of the bridge [6]. [5] Village gates - entering and leaving the village. [7] Hospital - you respawn there after fainting in battle [8] Hotsprings - for low level mission I also made a simplistic map of Konoha, so you can navigate through it easily. Each square shows the most important places in the village that you will be visiting quite often, in relation to others. For example, the Academy [1] is located on the North-west part of the village. The Shopping area [4] (also called Square) is between the Hospital [7] and the Hotsprings [8], right above the village gates [5]. At first, you will only need the Hokage building and the Gates. After becoming Genin, you have to head over to the Hokage building and accept your first mission. You can take 3 missions a day and they get better with levels. Your first mission is most likely going to be to hunt Larvas. These are the weakest mobs in the game and you will be there for a while. Leveling from 1-10 is probably the most tedious part. It takes even experienced players hours to get there. *Map of the first few areas in Leaf village. Will add a full World Map, provided by @Definitely Not Luffy, further down in the guide. As I said, leveling from 1 to 10 takes a while and is pretty boring. It is going to change in the (hopefully) near future when the new engine is released and there is an actual questline, but for now, the best you can do is start by killing larvas. I'd suggest picking all the cocoons they drop and selling them. Elemental masteries can buy a kunai from the Weapons shop for 80 ryo (1 cocoon = 1 ryo), which makes leveling for them easier. Melee masteries get to 10 faster, since their basic attacks deal more damage and they can equip swords. As leveling differs for different masteries and to a point depends on personal preferences and experience, I'll try to give my recommendations for training spots. They may not be the most optimal, but hopefully it will give you an idea of what you have to be doing. From level 1 to 5 you should stick to killing larvas and picking up all cocoons and if lucky - blank scrolls, you will need a lot of them for Jutsus. You should know what blank scrolls do by now (from the tutorial), but just in case.. blank scrolls drop from monsters, they have a low drop rate which makes them very valuable. You can take your blank scrolls to the Scroll shop in the village and Enchant them into Sealable Scrolls (it consumes the scroll and has a set chance to succeed/fail). Different level jutsus require a different level blank scroll. For example: Level 1-19 jutsus require a Sealable Scroll I, which has 50% chance to succeed from a blank scroll. Level 20-29 jutsus require a Sealable Scroll II, with 30% chance. Level 30-35 jutsus require a Sealable Scroll III, with 10% success rate. Since January 17th 2018, there's now a limit to how many jutsus you can have. So you have to be careful which jutsus you pick. My advise is to check this page. It has all masteries and most of their jutsus, so you can choose for yourself which jutsus you will need. You should also plan ahead for your second mastery and all the jutsus that will come in the future. 1 - Max 5 Jutsus 5 - Max 6 Jutsus 10 - Max 7 Jutsus 15 - Max 8 Jutsus 30 - Max 11 Jutsus 50 - Max 15 Jutsus I decided to use @Satsurie's table of jutsus. It shows you the levels needed for each jutsu of each mastery. It may be incomplete, since it's an old table, so I will revise it eventually. If your Enchanting is successful, you can trade it for a jutsu scroll. You won't be using the blank scrolls until level 15 (or lv16 for Lightning mastery), so just save them. You get a free jutsu at level 10, which is the level you get to pick your first mastery (I will get to it shortly). Anyway, as I was saying, you stay at Larvas from 1-5 (you can stay there until 10 if you'd like, it will just take a lot of time). It's recommended to try and find other people to team up with. The teaming system in Nin isn't the greatest, but it helps early on and making new friends can make the grind a lot less tedious. After 5, when you have a weapon bought, you can go to Spiders. Again, don't forget to use your missions. I'd recommend staying there until level 10. After hours and hours of grinding (hopefully atleast a bit enjoyable), you get to pick your first mastery. As of right now, there are 8 masteries in the game - 5 elemental and 3 non-elemental masteries. Fire Elemental Mastery allows the ninja to learn Fire techniques that allow ninjas to dish out large amounts of damage to multiple ninjas. Wind Elemental Mastery allows the ninja to learn Wind techniques that are sharp, fast and deadly. Lightning Elemental Mastery allows the ninja to learn Lightning techniques that are high in damage and immobilizing. Earth Elemental Mastery allows the ninja to learn Earth techniques that have large area of effect and effectively control crowds. Water Elemental Mastery allows the ninja to learn Water techniques. Water is a very balanced nature and as such can be useful in many situations. Medical Mastery allows the ninja to learn Medical techniques such as healing and reviving fainted ninjas, as well as harness the deadliness of poisons and toxins in combat. Weapon Mastery gives the ninja strong control over tools and blades, making them able to use things like Shurikens, Kunais, Swords in extraordinary ways. Taijutsu Mastery allows the ninja to master hand-to-hand combat and learn Taijutsu techniques, taking physical limitations to a new level. I will not go in detail for each mastery, I've instead linked the wiki articles to the names of each mastery. You can find everything about them there - jutsus, strenghts, weaknesses, etc. Elemental masteries' damage scales with intelligence, Wind making the one exception. Non-elemental masteries' builds however, are mostly up to preference. Medical ninjas can go for either Chakra or Int, or the combination of the two. Weapon masters can use Strenght for weapons or Int for tools/traps. Taijutsu masters can choose to go either Agility Tai or Leaf's special - Gentle fist. The former uses Agility for damage. The latter uses Strength. After a patch from the 25th January 2018, stat requirements were implemented, making hybrid builds not (as?) viable. In my opinion, Best PvE masteries (for leveling up) are Fire, Earth and Water, due to their AoE jutsus. Best PvP masteries are Water, GF, Earth; Water, Earth and Fire excel in teamfights. A generic elemental build (and my own, as a Water user) would be, ~100 int, ~1000 HP and ~250 chakra . This is just an example, as there are many combinations you could use, depending on how you want to play your game. HP has higher value than damage, since 1 point in Fortitude increases your Hit points by 10, while 1 point in Agi, Str or Int increases your damage by a lot less. For example, Water jutsus gain about 4 damage per 5 points (the amount you get from leveling up) in Int. 5 points in HP would increase your HP by 50. For more detailed information on masteries and builds, I'd suggest checking @Jun's guide here; and @Daishin's guide here. They will help you find the build that fits your own playstyle. If you feel like the mastery you've chosen isn't the right one for you, you can reset your progress in the Account Manager on the first floor of the Hokage building. Be careful with it, because you will lose everything, except for most Cash Shop items. Your levels, your items, your jutsus, your ryo, everything will be lost and you will start again from level 1. Be careful with your stat distribution aswell. Stats can only be reset by resetting your whole character, or by purchasing a Stat Reset Scroll from the Cash Shop. At level 10, you get to pick your first mater. A window will appear as you level up and you just have to choose the mastery you want. This is when you get your first mastery jutsu. You get a free scroll from the Scroll shop, for you to get your lv10 jutsu. After trading the scroll, it will appear in your inventory. You can learn the jutsu by using the scroll (double LMB click or right-click + use). The jutsu will then appear in your jutsus menu [J]. You then drag it onto your hotbar on the bottom of the screen. After level 10, You should try and do the Seals missions in both Leaf and Sand village (it will be hard to do them in Sand, because the two villages are in war). You start getting better Daily missions after this point, aswell. For monsters at this level, I'd recommend Wolves. They have 72 HP and deal 25 damage (so it's advised to invest a few points in fortitude). On kill, they reward 67 exp points. World blessing helps a lot here and will be quite helpful for the rest of your leveling. It is a Cash shop item that boosts the experience gain for all the players in the server by 1.5x (50%) for 1 hour. @Itachi Uchiha reminded me of something I had forgotten to mention. The Blessings work on missions aswell as farming. Some of the daily missions, especially the ones in the higher levels that give hundreds of thousands of exp, are better done in Blessing. For example a level 30 mission, called Docs for short, gives about 200k base experience, with World Blessing buff, the exp goes up to 300k. It is up to preference if you would like to wait for a blessing when turning a mission in. On the other hand, for the special missions (like Venoms mission, Seals, Toad missions, Bandit mission, etc.), waiting for a Blessing is a must. They can only be done once and some of them give you a whole level if you do them in Blessing. The one thing you need to know about Blessings is, you don't ask for one. If somebody wants to buy one and use it, good. Again, as Larvas (and same goes for Spiders), try and pick up everything that drops. I've had a lot of luck with Blank scrolls at Wolves, so now may be a good time to collect some scrolls. I'd stay at Wolves until level 15 ish, which is when you get your 2nd jutsu (unless you're lightning). After Wolves, you should head to Tigers. If you are a melee mastery, I'd stay at Wolves longer, since basic attacks stop being as efficient at this point and elemental masteries start leveling a lot faster than melees, due to their high damage ranged attacks. I have a very limited knowledge about melee masteries' leveling methods, so I will continue with just the Elemental masteries. Tigers are the first aggressive mobs that you will encounter. They will try to attack you when you go close to them, and they will actually chase you down. A team is recommended, since they have quite a bit of HP (104 for the normal tigers and 146 for White tigers). Their attacks hurt a lot more, too, so you will need to have atleast 200 HP by this point. On kill they give 97 and 127 exp points respectively for normal and White tigers. You'll stay at tigers until level 20 ish. An important thing I have to mention is, you stop getting experience from monsters when you reach a level 10 levels higher than theirs. For example, if the normal tigers are level 13, you stop getting exp from them at level 23. So you could technically stay there until then. Afterwards, you can try to go to the Sewers in village. It's where the Rats dwell. They are aggressive, just like Tigers, have 193 HP and damage you for 53 damage. They give 172 experience points on kill and have a chance to drop a rare item - a sword called Twin Fangs (ADD A SCREENSHOT!) and is worth quite a bit of Ryo. You should be able to get to level 25 quite easily here. Just walk around, aggro all Rats and try to kill them with AoE jutsus (if you have any). It is also a good time to do the Venoms mission. It takes 100 Snake venoms and as Snakes are too strong for you at this level, you have to try and get the Ryo to buy them. Right now, 1 venom costs 15-20 ryo, so 100 venoms would cost between 1.5 and 2k ryo. It really depends on the mastery and your knowledge of the game. A lucky drop of Twin Fangs (considering you won't be using it) can make you more than enough Ryo to afford it, as it sells for roughly 5k ryo. You should also try and find a high level player to help you with defeating Guren, a boss in Takumi - the village of the missing ninjas. That is right, there is a 3rd Village. You can become a missing Ninja by betraying your village or a Hermit, by asking the Kage of your village to exile you, so you don't have to be sided with either of the original Villages. It is not recommended to become missing, especially if you are new, since they are enemies to everyone and are being hunted. After lv 25, you should try and go to the Snakes' lair, which is filled with Snakes (duh..). There's a lot of snakes and they hurt a lot, so a team is recommended. You can make a lot of ryo here, since their Venoms are very sought after. If they are too hard for you or you don't have a team, I'd REAAAAALLY recommend going to Big Scarabs in the Sand Village. This is literally the best map in the game for grinding. Trust me, if you are an elemental mastery and deal enough damage, you won't want to ever leave that map. There's a big map in which you can aggro 10+ mobs and kill them with AoE jutsus. They have the same stats as rats and drop another rare item - Seji no Hani (also known as Double Fan). Only downside to this map is the close proximity to Sand Village and the risk of being found and killed. You should also not forget to do your missions. Guard Duty aswell as Parcel Delivery give a very nice exp and should be done as much as possible. Until a while ago, missions were sharable, so they could be done daily, even a few times a day, but now you can only get missions from the Missions desk. At level 30, a new NPC appears in the Missions room. By talking to Hitsutomo, you can start the missions leading to the newly released Toad Village. I will not get in details about it, but it is kind of hard. If you do manage to do them, aswell as the missions in the Toad Village, you will get quite a bit of exp and levels. After level 30, there aren't many options. Leveling becomes slow, grinding feels unnecessary and pointless, so you mostly do daily missions. At this point you start getting missions that give you 2-3 hours worth of grind experience, which are your main source of exp. You can always go and grind monsters for some extra exp, but it just doesn't feel very rewarding. You can use this time to level up your jutsus. You'd probably realise it by this point, but your jutsus level up when you use them on monsters (or players). Each level makes the jutsu slightly better (extra damage, lower cooldown, bigger range, etc.). Levels 30-50 (which is the level cap) take a lot of time and patience. Just do your dailies everyday. You can grind mobs solo up until level 46 (Bears being level 36 and higher leveled mobs being too hard for soloing). After the long (I'd say about month and a half to 2 months) and mostly boring grind, you hit 50 and it is time to choose your 2nd mastery. Again, it's only a recommendation, not the optimal way to train, and it'd probably be a lot different for elements and melee users, as I haven't really played the latter, but to summerize the Leveling part of the guide: Level 1-5 - Larva Level 5-10 - Spiders Level 10-15 - Wolves Level 15-20 - Tigers Level 20 - 25 - Rats (Path to Sewers opens after doing Leaf Seal mission) Level 25 - 30 - Snakes or Big scarabs Level 30-35 - Toad Village Missions, Bears and the high level Missions like Docs, WW, etc. Level 35-46 - Bears and Daily missions Level 46-50 - Daily missions ----------------------------------------------------------------------------------------------------------------------------------------------------------------------------------------------------------------------------------------------- 1. SAND GUIDE Both Sand and Leaf villages are a good place to be. You will not gain any particular advantage by choosing any of the two. The main difference between the two is the mobs, the clothing, the exclusive masteries (Gentle fist for Leaf, Fan style for Sand). After creating your character in Sand, you will appear in a big training room. The first thing you need to do is speak to Saita. He will guide you through what you have to do. After finishing the dialogue, arrows will appear and you have to go to the right. You will then head to the rooms in the north side of the room. Just like in Leaf, you will have to complete all 4 parts of the tutorial and they will give you the basics you need to start your adventure. The first room will introduce you to masteries, stats and different types of zones (PvP wise). In the second room you will learn your first jutsu - Cloak of Invisibility. Speak to the scroll on the table, after the dialogue, open your Inventory (I) and double click on the scroll. Then open your Jutsus menu (J) and drag the jutsu on your hotbar (by hovering over it and dragging it down, while holding your LMB). To cast jutsus you need Chakra. It appears on the bottom of the screen in blue colour (right of HP bar [red]). You charge chakra by holding C. When you charge your chakra, press the hotkey on which you put the cloak (or just double click on it in your Jutsus menu), and pass the scorpions. You have to be invisible to make it through, they will kill you otherwise. Then speak to Tama. The third room is target practice. You will learn how to use tools. Break the boxes on the right by hitting them (Z), then pick up the tools by pressing C once. Assign them to your hotbar by dragging them from your inventory. PSA: The tools will disappear after you leave the room, so you shouldn't be picking more than 5. In the last room, you will be introduced to combat. After speaking to the NPC, activate the scroll on the left. A few scorpions will spawn and you will have to hit them. You will inevitably die and respawn on a bed. It is to teach you of Battle injuries. Go to the right and back in the room, interact with the scroll and it will spawn a different type of mobs - ducklings. They are easy to kill and you only need to kill one. Then talk to the NPC again and your tutorial is over. Leave the room and an arrow will appear. Follow it and you will enter a room with scorpions in it. You have to kill 10 scorpions and collect their tails to be able to proceed. After you have them, talk to the NPC, then to the wall circled in red in the screenshot below. After interacting with it, you should be able to enter and interact with the scroll on the table. A 20 questions exam will begin. It is split in 2 parts with 10 questions and you have to answer all questions correctly. After completing the exam, you will speak to the mentor and recieve your first rank - genin, and a headband. Here begins your real journey. After becoming a Genin, you will want to head north and leave the village, the map you will enter is called GD (from a mission called Guard Duty), I will use it for a reference point. Then go north-west until you reach your first mobs - larvas. You want to stay at larvas until you reach level 5. Pick all the cocoons and sell them in the shops in village. You have a chance to get blank scrolls, aswell. Keep those! After hitting level 4 (for int masteries) or 5 (for str masteries), if you have enough money or if you can find someone to give it to you, you can equip a weapon. Check leaf part of the guide for the weapons you need, aswell as the village map for the location of the shops. After this, you should head of the GD map. This is where scorpions are. You will be staying here until level 7. Again, pick everything they drop, you can even sell their drops to players, since they are needed for a mission. From level 7 to level 9, you will be killing stingers. You want to head to the map to the left of larvas. They drop the same item as scorpions, so you should keep those and sell to players, or you can sell in the shops again if you need the ryo fast. You then want to go to the left of the stingers map, where coyotes are. You will stay there from level 9 to level 13. At Level 10 you can pick your first mastery, so you can stay at stingers until you get to it. If you are unsure of what mastery you want or how it works, check the leaf part of the guide and/or the masteries wiki page. It is also a good time to do Seals missions in both Sand, and with some help, Leaf villages. It is important to do them during a blessing (explained in the Leaf part). From levels 13-17, you should go to Scarabs. They are located above the stingers map. They are the first aggressive mobs you will face, and they are many, so you should be extremely careful and if possible, find a team. After level 17, you should go to the Tunnelers. There are 2 maps where you can find them. One of them is left of Coyotes. The other is a bit further away, but it's easier, since there is more space to run around and kite. Go right of the scorpions map, then go all the way up. You will find them there. You should stay there until around level 23. From 23 to around 25, you should go to Big Scarabs cave, located on the north side of the Scarabs map. You need to have completeled the Sand seals mission for it to open. After that you can go to Snakes (use the world map below to navigate) until you no longer get exp from them and then to Bears until level 46. After level 30, your main source of exp are missions, but you should still grind monsters for extra exp. At level 30 you can start the Toad Village questline by speaking to the Frog in the missions room. Completing the whole questline will give you a lot of exp. To summerize: 1 - 5 Larva 5 - 7 Scorps 7 - 9 Stingers 9 - 13 Coyotes 13 - 17 Scarabs 17 - 23 Tunnelers 23 - 25 Big scarabs 25+ - Snakes * - 46 - Bears I'm not at all experienced or knowledgable with leveling in sand, so I had to use @Hotaru's help for it. I'd advise reading the Leaf part of the guide, since it has more information for each level. In conclusion, the most important thing in leveling and for playing the game in general, is to try and make friends. Be nice to people, join an organization or a clan (I will talk about them later), be a part of something big. Or find a goal (Being a Hokage, in the ANBU, etc.) to work for. The grind feels a lot more fun and rewarding. *Underneath is the full World Map with all the current areas and maps (except for Toad, as it's a different instance). Big thanks to @Definitely Not Luffy for showing it to me. The map will be very useful for you and I will be using it to pinpoint locations in the guide. ------------------------------------------------------------------------------------------------------------------------------------------------------------------------------------------------------------------------------ PART III. GAME KNOWLEDGE. 1. Roleplay The game is very RP oriented, we create our own organizations and clans. We have Akatsuki, ANBU, Village Leaders, Chunins, et cetera. It is very important to be able to stay in character. If you are new to Roleplaying, I'd suggest checking Saku's guide. A big part of roleplaying is using the chat correctly. You can use "/e" in chat to express emotions or describe an action. For example "/e is sleeping" would appear as Origami Heart is sleeping. Other chat commands that can be used in RP are: /y - /r - /n - /<3 - /go - /... - /! - /? - /huh - /clap - /slowclap - /' - /cry - /wave - /wave (changed) - /grr - /!! - /321 - (3 2 1 GO! animation) (they appear ontop of your character) To speak out-of-character use parentheses, for example - (I need to afk for a bit). ------- There are also RP missions, which Ranked ninja (Chunin and above) can host for other players in their village. RP Missions are player-ran missions that reward players for role-playing. The rewards for each mission are not substantial to the point where it is unfair if you just want to play the game without RPing, but is designed to encourage players to take a break from grinding and reward them for role-playing if they're already acquainted with the magic of it. For players who don't know the magic yet, it provides an incentive for them to give it a try. They way they work is: All players can take RP Missions from the 2nd NPC at the Mission Assignment Desk (Koda for Leaf / Basho for Sand) You can take RP Missions at Levels 12, 17, 22 and 27. Each of which is a tier higher than the next. Ranked ninja (Chunin and Above) will announce their availability for an RP Mission in village chat. Ninja who want to attempt an RP Mission should form a team of 3 and find a Ranked ninja (Chunin and above) to be their team leader and host their RP Mission. The Ranked ninja will assign an appropriate task, training or RP scenario which should take estimatedly 30 minutes, or longer (with prior notice) On completing the task, they will be handed RP Tokens to claim their rewards from the Mission Assignment Desk. Currently there are 7 ranks in a village (they are almost purely for RP purposes): Academy Students is the rank you start with when you start the game. Genin is the first obtainable rank, after you graduate from the academy. Specialized Jonin is a title rewarded to those who've proven worthy of it by showing unmatched skills in something. Chunin is the title you obtain after successfully pass the Chunin exam, which is hosted every few months. You become a Jonin by leading a team of Genins to the Chunin exam and host a set number of RP missions. You have to help others daily. Chunin rank is required for promotion to Jonin. Council members are chosen by the village in the council election. They work closely with the Hokage and help them make important decisions. The Kage is elected by the council members. They are the most important ninja in the village and make all the final decisions for the village's future. They have the power to exile people (the Missing ninjas I've mentioned before). There are 2 ranks that are obtained by completely other means and have different purpose. Gold Ninja is given to those who've decided to purchase premium membership and support the game. Silver Ninja is given to people who've contributed to the development of the game. ---- There are also clans nad Organizations that you can join. They are created by players and for now, they are purely for RP. They are not a part of the game, for now. You can check the current organizations here. The clans you can see in the Village forums. 2. Shopping for clothes (WIP) As I mentioned at the beginning of this guide, there are a few ways to customize your character, after it's been created. The most common and accessible way is buying in-game clothing from the stores in villages. As I already mentioned, currently there are 3 villages. Each Village has different clothing to offer. (images and prices are taken from Wiki as the game as it would take too long to go to each village, credits to the creators) PSA: New items are being added in the shops all the time, so make sure you check them out if I haven't added them here. LEAF SAND TAKUMI Other shops to buy clothing and accessories from are: ((ADD SCREENSHOTS)) Event HQ in Takumi Leaf's Optic Store Sand's Utility Store There is another way to customize your character - the Cash shop. You can buy costumes, accessories, or get a new hairstyle. *Example of my character with a premium hairstyle, armor and a back scroll. On a side note, there are shops in every village that sell food (for RP purposes, I suppose, it doesn't actually heal you), like ramen, sushi, even a famous brand of soda. There are, however, shops that sell health and chakra regenerating "potions". You can buy Blood Pills and Chakra Pills in every village, and Toad Oil in the Toad Village. I will not go into them too much, because I don't really use them. 3. Items obtained from drops (WIP) Gas mask, cigarette, double fan, twin fangs, gafuki sword ((ADD MORE AND INCLUDE SCREENSHOTS)) Twin fangs - dropped by Rats in the sewers in Leaf village. No Hani (also known as double fan) - dropped by Big Scarabs near Sand village. Gas mask - dropped by one of the bandits on the Snow mointain (after Snow wolves). 4. Ryo making guide (WIP) venom, rares, other quest items ((TO ADD MORE)) For ryo, at early levels, you want to pick up everything that mobs drop and sell in the shops in village. You should keep some of them, like cocoons, spider eggs, big scarab shells, etc., since they are needed for missions. You can sell those to players. At higher levels, best items to farm for selling are: Snake venoms - in the snake lair, right of the 2nd bear map (from Leaf). Snow Wolf fur - from Snow wolves, left of the 2nd bear map, in a cave past Koji. Blank scrolls - after getting all of your jutsus, they drop from any mob. Rare items - Rats, Big Scarabs, Bandits in both Takumi and Snow mountain. @Niti made it easier for me by creating a price list. You can check the price of every item there and choose the item you want to farm for ryo, based on what's easy and/or most profitable for you. ---------------------------------------------------- Thank you for checking my guide. I hope it will help you in your journey! TO DO: -Add more information -Make the guide more presentable - FAQ1 point
This leaderboard is set to Toronto/GMT-04:00
 HITSPARK



.thumb.gif.894018af4fde630749fa9798c99747da.gif)


